Wednesday, September 30, 2009

Useful GPS Information


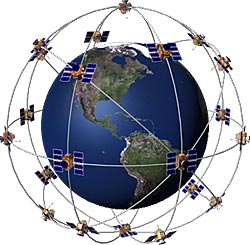
The Global Positioning System (GPS) is a satellite-based navigation system made up of a network of 24 satellites placed into orbit by the U.S. Department of Defense. GPS was originally intended for military applications, but in the 1980s, the government made the system available for civilian use. GPS works in any weather conditions, anywhere in the world, 24 hours a day. There are no subscription fees or setup charges to use GPS.

How it works

GPS satellites circle the earth twice a day in a very precise orbit and transmit signal information to earth. GPS receivers take this information and use triangulation to calculate the user's exact location. Essentially, the GPS receiver compares the time a signal was transmitted by a satellite with the time it was received. The time difference tells the GPS receiver how far away the satellite is. Now, with distance measurements from a few more satellites, the receiver can determine the user's position and display it on the unit's electronic map.

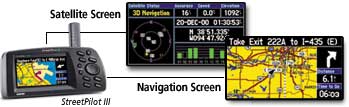
A GPS receiver must be locked on to the signal of at least three satellites to calculate a 2D position (latitude and longitude) and track movement. With four or more satellites in view, the receiver can determine the user's 3D position (latitude, longitude and altitude). Once the user's position has been determined, the GPS unit can calculate other information, such as speed, bearing, track, trip distance, distance to destination, sunrise and sunset time and more.

How accurate is GPS?

Today's GPS receivers are extremely accurate, thanks to their parallel multi-channel design. Garmin's 12 parallel channel receivers are quick to lock onto satellites when first turned on and they maintain strong locks, even in dense foliage or urban settings with tall buildings. Certain atmospheric factors and other sources of error can affect the accuracy of GPS receivers. Garmin® GPS receivers are accurate to within 15 meters on average.

Newer Garmin GPS receivers with WAAS (Wide Area Augmentation System) capability can improve accuracy to less than three meters on average. No additional equipment or fees are required to take advantage of WAAS. Users can also get better accuracy with Differential GPS (DGPS), which corrects GPS signals to within an average of three to five meters. The U.S. Coast Guard operates the most common DGPS correction service. This system consists of a network of towers that receive GPS signals and transmit a corrected signal by beacon transmitters. In order to get the corrected signal, users must have a differential beacon receiver and beacon antenna in addition to their GPS.

The GPS satellite system

The 24 satellites that make up the GPS space segment are orbiting the earth about 12,000 miles above us. They are constantly moving, making two complete orbits in less than 24 hours. These satellites are travelling at speeds of roughly 7,000 miles an hour.

GPS satellites are powered by solar energy. They have backup batteries onboard to keep them running in the event of a solar eclipse, when there's no solar power. Small rocket boosters on each satellite keep them flying in the correct path.

Here are some other interesting facts about the GPS satellites (also called NAVSTAR, the official U.S. Department of Defense name for GPS):

  • The first GPS satellite was launched in 1978.
  • A full constellation of 24 satellites was achieved in 1994.
  • Each satellite is built to last about 10 years. Replacements are constantly being built and launched into orbit.
  • A GPS satellite weighs approximately 2,000 pounds and is about 17 feet across with the solar panels extended.
  • Transmitter power is only 50 watts or less.

What's the signal?

GPS satellites transmit two low power radio signals, designated L1 and L2. Civilian GPS uses the L1 frequency of 1575.42 MHz in the UHF band. The signals travel by line of sight, meaning they will pass through clouds, glass and plastic but will not go through most solid objects such as buildings and mountains.

A GPS signal contains three different bits of information — a pseudorandom code, ephemeris data and almanac data. The pseudorandom code is simply an I.D. code that identifies which satellite is transmitting information. You can view this number on your Garmin GPS unit's satellite page, as it identifies which satellites it's receiving.

Ephemeris data tells the GPS receiver where each GPS satellite should be at any time throughout the day. Each satellite transmits ephemeris data showing the orbital information for that satellite and for every other satellite in the system.

Almanac data, which is constantly transmitted by each satellite, contains important information about the status of the satellite (healthy or unhealthy), current date and time. This part of the signal is essential for determining a position.

Sources of GPS signal errors

Factors that can degrade the GPS signal and thus affect accuracy include the following:

  • Ionosphere and troposphere delays — The satellite signal slows as it passes through the atmosphere. The GPS system uses a built-in model that calculates an average amount of delay to partially correct for this type of error.
  • Signal multipath — This occurs when the GPS signal is reflected off objects such as tall buildings or large rock surfaces before it reaches the receiver. This increases the travel time of the signal, thereby causing errors.
  • Receiver clock errors — A receiver's built-in clock is not as accurate as the atomic clocks onboard the GPS satellites. Therefore, it may have very slight timing errors.
  • Orbital errors — Also known as ephemeris errors, these are inaccuracies of the satellite's reported location.
  • Number of satellites visible — The more satellites a GPS receiver can "see," the better the accuracy. Buildings, terrain, electronic interference, or sometimes even dense foliage can block signal reception, causing position errors or possibly no position reading at all. GPS units typically will not work indoors, underwater or underground.
  • Satellite geometry/shading — This refers to the relative position of the satellites at any given time. Ideal satellite geometry exists when the satellites are located at wide angles relative to each other. Poor geometry results when the satellites are located in a line or in a tight grouping.
  • Intentional degradation of the satellite signal — Selective Availability (SA) is an intentional degradation of the signal once imposed by the U.S. Department of Defense. SA was intended to prevent military adversaries from using the highly accurate GPS signals. The government turned off SA in May 2000, which significantly improved the accuracy of civilian GPS receivers.

Monday, September 28, 2009

LINUX vs. WINDOWS

From my research, there is to many comparison of Linux and Windows. It can serve as an introduction to Linux for Windows users. Here I list down some of the comparison :


1)Flavors

Both Windows and Linux come in many flavors. All the flavors of Windows come from Microsoft, the various distributions of Linux come from different companies (i.e. Linspire, Red Hat, SuSE, Ubuntu, Xandros, Knoppix, Slackware, Lycoris, etc. ).

Windows has two main lines. The older flavors are referred to as "Win9x" and consist of Windows 95, 98, 98SE and Me. The newer flavors are referred to as "NT class" and consist of Windows NT3, NT4, 2000, XP and Vista. Going back in time, Windows 3.x preceded Windows 95 by a few years. And before that, there were earlier versons of Windows, but they were not popular. Microsoft no longer supports Windows NT3, NT4, all the 9x versions and of course anything older. Support for Windows 2000 is partial (as of April 2007).

The flavors of Linux are referred to as distributions (often shortened to "distros"). All the Linux distributions released around the same time frame will use the same kernel (the guts of the Operating System). They differ in the add-on software provided, GUI, install process, price, documentation and technical support. Both Linux and Windows come in desktop and server editions.

There may be too many distributions of Linux, it's possible that this is hurting Linux in the marketplace. It could be that the lack of a Linux distro from a major computer company is also hurting it in the marketplace. IBM is a big Linux backer but does not have their own branded distribution. Currently there seem to be many nice things said about the Ubuntu distribution.

Linux is customizable in a way that Windows is not. For one, the user interface, while similar in concept, varies in detail from distribution to distribution. For example, the task bar may default to being on the top or the bottom. Also, there are many special purpose versions of Linux above and beyond the full blown distributions described above. For example, NASLite is a version of Linux that runs off a single floppy disk (since revised to also boot from a CD) and converts an old computer into a file server. This ultra small edition of Linux is capable of networking, file sharing and being a web server.


2) Graphical User Interface

Both Linux and Windows provide a GUI and a command line interface. The Windows GUI has changed from Windows 3.1 to Windows 95 (drastically) to Windows 2000 (slightly) to Windows XP (fairly large) and is slated to change again with the next version of Windows, the one that will replace XP. Windows XP has a themes feature that offers some customization of the look and feel of the GUI.

Linux typically provides two GUIs, KDE and Gnome. See a screen shot of Lycoris and Lindows in action from the Wal-Mart web site. The lynucs.org web site has examples of many substantially different Linux GUIs. Of the major Linux distributions, Lindows has made their user interface look more like Windows than the others. Here is a screen shot of Linux made to look like Windows XP. Then too, there is XPde for Linux which really makes Linux look like Windows. Quoting their web site "It's a desktop environment (XPde) and a window manager (XPwm) for Linux. It tries to make easier for Windows XP users to use a Linux box."

Mark Minasi makes the point (Windows and .NET magazine, March 2000) that the Linux GUI is optional while the Windows GUI is an integral component of the OS. He says that speed, efficiency and reliability are all increased by running a server instance of Linux without a GUI, something that server versions of Windows can not do. In the same article he points out that the detached nature of the Linux GUI makes remote control and remote administration of a Linux computer simpler and more natural than a Windows computer.


3)Text Mode Interface

This is also known as a command interpreter. Windows users sometimes call it a DOS prompt. Linux users refer to it as a shell. Each version of Windows has a single command interpreter, but the different flavors of Windows have different interpreters. In general, the command interpreters in the Windows 9x series are very similar to each other and the NT class versions of Windows (NT, 2000, XP) also have similar command interpreters. There are however differences between a Windows 9x command interpreter and one in an NT class flavor of Windows. Linux, like all versions of Unix, supports multiple command interpreters, but it usually uses one called BASH (Bourne Again Shell). Others are the Korn shell, the Bourne shell, ash and the C shell (pun, no doubt, intended).


4)Security

Linux [has] ... the notion of an administrative (root) user that maintains and operates the system, and desktop users who only run the software on the system, is completely ingrained in most Linux distributions. Now it’s true that many Linux users ignore these features and run all their software from a root-level account anyway, but that’s a choice that they’ve made. The system defaults to protecting the operating system components from its user’s actions (intentional or otherwise). That feature alone must account in large degree for the dearth of viruses and other malicious vermin on Linux and UNIX platforms. Windows, on the other hand, started life as a single user system, with that single user being all-powerful. Although that’s no longer the case, the general attitude can still be found in many Windows-based software products – many of which just can’t be installed and/or run properly without desktop administrator privileges. This is all changing for the better, but it took Microsoft far too long to adopt this default-secure configuration practice.

Source Linux vs. Windows: Which is Most Secure? (March 2007) Kenneth van Wyk.


For this moment only these few comparison I listed down. Will update soon..


Sunday, September 27, 2009

Hack Windows Vista Logon Account Password In 3 Minutes

  1. Reboot the Windows Vista and boot up with Windows Vista installation DVD.
    Crack Windows Vista logon account password in minute with the Windows Vista installation DVD. Click on the Repair Your Computer option, bring up Command Prompt to open Local Users and Groups management in MMC.
  2. While the Windows Vista installation interface pops up, click the Repair You Computer link at the bottom-left corner.
  3. Next, the System Recovery Options dialog box appears. There are few options that related to repairing Windows Vista, looks like Recovery Console in Windows XP:
    Startup Repair options is used to automatically fix problems that are preventing Windows Vista from starting.

    System Restore to restore Windows Vista setting to an earlier point in time.

    Windows Complete PC Restore to restore Windows Vista from a full system backup.

    Windows Memory Diagnostic Tool could be the first Microsoft memory tester toolkit that bundled with Windows setup media.

    Command Prompt is the target option of this Vista hacking guide. Click on this option now.
  4. In the Vista Command Prompt, type mmc.exe and press ENTER key to bring up the Microsoft Management Console.
  5. Click on the File menu, select Add / Remove Snap-in option, locate and select the Local Users and Groups on the left panel, and click Add button to add it to the right panel.
  6. Now, the Choose Target Machine dialog box pop up. Keep the default setting by clicking the Finish button – that means using the Local Users and Groups snap-in to manage this local computer, and not another computer in network.
  7. Click OK button and return to MMC windows. Under the Root Console in left panel, double-click Local Users and Group that was added earlier. Click on User folder, locate and right-click the target Vista logon account that found in the right panel.
Select the Set Password from the right-click menu to set a new password / reset old password.

Friday, September 25, 2009

How to Write a Batch File For Windows

  1. Open up Notepad in Windows. You can do this by navigating to Start > Programs > Accessories > Notepad, or simply by entering notepad under Start > Run.
  2. Or open up notepad by C:\WINDOWS\system32\notepad.exe
  3. Save your file before anything, so be sure to follow the instructions closely.

    1. Go to File > Save As... and chose a file name.
    2. Choose your desktop as the location to save, for now. Don't click Save just yet.
    3. Click on the dropdown menu next to "File name". Select "All files" instead of Text Document".
    4. Add .bat to the end of your file name before you save. For example, you would type example.bat.
    5. Click on Save. If you did this correctly, you should see your file name in the title of Windows Notepad. Make sure that it reads as example.bat—not example.bat.txt. Now you are ready to create your batch file.
  4. Type "@echo off" on the first line of your batch file. This will prevent any spaces in the batch file to be read by the program when executed.
  5. Enter your commands. The following example below will show you how to create a batch file that will automatically load wikiHow.com using Internet Explorer.
    • @echo off.
    • REM The following will open wikiHow.com in a new Internet Explorer window.
    • "start Iexplore.exe www.wikihow.com"
    • REM The following will open wikiHow.com in your default browser, but if it is IE and you have another IE window open, then it will hijack that window.
    • "start www.wikihow.com"
  6. Save the file by going to "File>Save" and type in "wikihow.bat".
  7. Run the file by double clicking the file on your desktop.


Setup Virtual Network Drive

If the drag and drop functionality has been included as part of your Freestyle deployment, follow the steps below to setup your virtual folders.

As with the web-based system, the virtual drive requires you to enter your secure Freestyle username and password for access.

Thursday, September 24, 2009

Ghost Story..

Hantu Arwah Gentayangan


i dont really believe with this ghost picture, i can't determine which is the ghost. if we watch at the left side of the picture we can found some thing strange which appear and looked like a pocong ghost. but when we move to the right side of the picture, there we can find there is a strange light which is looked like the light of a jin ghost which usually appear as a spirite or the piwer of mystical material. this picture is not so scary but it so interested to be talked at this blog.

Penampakan Hantu Wewe Di Sekolah Serem Banget


i was really impressed by this ghost picture, when the first time i watch this ghost picture i remember one of the most scary movie. it is the ring ghost. do you still remember with the ring ghost? yes when i watch this ghost picture, then i remember with the ring ghost. this is just looked like a japan ghost which appear as a woman with white skin and long black hair. she have a long black finger and she wear a white dress. she look so perfect like a kuntilanak ghost. but i dont really believe that this ghost is true ghost picture :)

Asap Yang Mirip Hantu Kuntilanak

This is one another kuntilanak ghost which i write on this blog. as we know that kuntilanak ghost is the ost wanted ghost to view. i know it from te information that i got from the shutbox that there so many people who afraid with kuntilanak ghost. kuntilanak ghost also clasified as woman ghost. their appearance is looked like a wewe ghost and sundel bolong ghost. based on the kuntilanak ghost the movie kuntilanak was a ghost which is looking for her cildren. which die when she was pregnan. she was born in the yard.

Penampakan Hantu Kuntilanak Di Sebuah Lorong


This is one another kuntilanak ghost after so long time i stop to write on this blog. look at the ghost picture that seems like a real ghost picture is not it? but how can this ghost be? it is really imposible for some one to capture a ghost picture as close and as near as this picture. can yu imagine when you are alone and then when you anter some room you are shocked with the appearance of this ghost. like on the movie then you will be huned every time and you will be fear for ever you can not sleep deeply.

Song Of The Day..Saat Terakhit by ST12

ST12 – Saat Terakhir

tak pernah terpikir olehku
tak sedikit pun ku menyangka


kau akan pergi tinggalkan ku sendiri
*courtesy of LirikLaguIndonesia.net
begitu sulit ku menyangkal
begitu sakit ku rasakan
kau akan pergi tinggalkan ku sendiri


* di bawah batu nisan kini kau tlah sandarkan
kasih sayang kamu begitu dalam
sungguh ku tak sanggup ini terjadi


karna ku sangat cinta

** ini lah saat terakhirku melihat kamu
jatuh air mataku menangis pilu
hanya mampu ucapkan selamat jalan kasih


satu jam saja ku telah bisa
cintai kamu kamu kamu di hatiku
namun bagiku melupakanmu
butuh waktuku seumur hidup


satu jam saja ku telah bisa
sayangi kamu di hatiku
namun bagiku melupakanmu
butuh waktuku seumur hidup di nantiku


repeat **


satu jam saja ku telah bisa
cintai kamu kamu kamu di hatiku
namun bagiku melupakanmu
butuh waktuku seumur hidup


satu jam saja ku telah bisa
sayangi kamu di hatiku
namun bagiku melupakanmu
butuh waktuku seumur hidup


Download full MP3 at

http://www.4shared.com/file/135228638/cceee1d0/Saat_Terakhir.html

and video at http://www.youtube.com/watch?v=BlRKCUjucjI

Set Up RADIUS on Windows 2000

Here is a few step to set up RADIUS on Windows 2000 so you can autheticate wireless clients.

Requirements:
  • Windows 2000 with Active Directory (latest service pack)
  • Certificate server
  • IAS server
  • Access point with 802.1X capability, the following were used in this guide
    • Linksys BEFW11S4
    • D-link DI-824vup
  • Windows 2000 or Windows XP client with a wireless adapter (latest service pack)

Windows 2000 Radius server setup:

Make sure Active Directory and DNS are configured properly

  • Install the IAS and certificate server components from add/remove programs

After the IAS and certificate server components has been installed successfully. Setup the server as CA root and register the IAS server with Active Directory.

For help on setting up the certificate server for automatic certificate allocation:

  • Click Start, and then click Help
  • Click the Search tab, type the following text, and then click List Topics :

    configure automatic certificate allocation from an enterprise ca

  • In the Select topic list, click Configure automatic certificate allocation from an enterprise CA , and then click Display

To register the Radius sever:

  • Right click the RADIUS server and select the "Register in Active Directory" option.

  • Click ok when you see this message

  • Next right click the clients option and select create new client.

  • Name :
  • IP:
  • Click Verify to make sure its the correct IP
  • Client Vendor: Radius Standard
  • Check the "client must always send signature attribute in the request" box
  • Enter a secret key that will be exchanged between the access point and server

  • Edit the remote policy to include Extensible Authentication Protocol on the Authentication tab
  • Also add the group that you want to allow wireless access

Changing the user properties in Active Directory:

  • Give the user dial in permissions, or create a group and add the users to that group
  • Change domain mode to native to enable the Remote Access Policy option

Radius client setup:

D-link access point configuration:

  • Enable 802.1X
  • Encryption :enabled
  • Server: W2k Radius IP
  • Port : 1812
  • Radius secret : same as Radius server
  • WEP enabled (optional)

Linksys access point configuration:

  • Wireless security : Enabled
  • Security mode: Radius
  • Radius Servers address: W2k Radius IP
  • Port : 1812
  • Shared Key: same as Radius server
  • Wireless encryption type : 64bits 10HEX

Note: Once the Radius Server and clients are setup, stop and start the IAS service and reboot the access point.

Wireless client setup:

  • Select the "wireless networks" tab from wireless network properties
  • Highlight the access point in the available networks and click configure
  • On the "association tab" change the network authentication to "Open"
  • Data Encryption: WEP
  • If WEP was enabled on the router and a KEY was set then enter the Key here
  • if a WEP key was not specified on the access point then, check the "key is provided for me" option


Authentication tab

  • Enable IEEE 802.1x
  • EAP type: Select protected EAP (PEAP)


  • Click the properties button
  • Authentication Method: Secured password (EAP-MSCHAPv2)
  • Click the configure button
  • Uncheck the windows logon name and password box

  • Right click the wireless icon and select the "View available wireless networks" option
  • Select the wireless network and check the 802.1x box
  • then click connect (a WEP key may be needed if set on the access point)

  • A username and password screen will appear

  • Enter the domain username and password and click logon

  • Once connected the wireless icon will change

Problems that may occur while trying to connect:

Event ID : 2

  • If a problem occurs while trying to connect, check the application log on the server:
  • Make sure the correct domain credentials are provided

(This screen indicates incorrect credentials)

  • Make sure the user account has dial in permissions set to "Allow"
  • Uncheck the windows logon name and password box. As shown above in red text

Event ID: 14 or 18

  • Check the connection between the Radius server and the access point
  • Check the client information on the IAS server
  • Make sure the shared secret on the server matches the key on the client

All About Tattoos


Tattoo, sometimes thought as a letter or writing,somestimes a shape or picture.Sometimes to dress up and stress something.Yet,it is perhaps the art of expressing humanbeings themselves in an old way.In the modern world,the tattoo which is used widely in the west has continuously turned into a form of decorating in the urban life especially between young people.As it is a thing you have to carry on your body until your death, first of all, you must consider in detailed and later decide. As stated in the Anatolia tattoo culture, since tattoos made during the bachelorhood may cause form and apperance distortion at the end of the change occurring in the body, it is advised to tattoo after this period.

That the tattoo is perfomed by a good tattoo artist is the first condition to have a good tattoo and the second is you. Because the better you care for your tattoo, the better it will be. The next first week after the tattoo is applied is crucial. During the first three days, the tattoo must not contact with water itself. Your skin is much sensitive as the tattoo needles damage and an unusual material (paint) was injected to the skin.

Wednesday, September 23, 2009

Orion HCCA Subwoofers

Orion HCCA Subwoofers Info

Orion HCCA subwoofer are considered to be the biggest, baddest and most powerful subs Orion has ever created. Step up to premium SPL performance with these frighteningly powerful new red-and-black HCCA%u2122 10s and 4000-watt peak SPL performance with the new HCCA%u2122 12" and 15" subwoofers from Orion®, a world leader lane mayhem for 25 years.

Orion HCCA Subwoofer Series

HCCA102 (10 inch 2 ohm)
HCCA104 (10 inch 4 ohm)
HCCA122 (12 inch 2 ohm)
HCCA124 (12 inch 4 ohm)
HCCA152 (15 inch 2 ohm)
HCCA154 (15 inch 4 ohm)

What makes the Orion HCCA Subs special?

Below are the main features that make the orion subwoofers one of the best subwoofers out there:

- Dual 2ohm or 4ohm Copper Wound Voice Coil on an Aluminum Former
- High Temperature PAARC (Polyester Amide, Amide Resin Coated) Voice Coil
- Dual Flat Conex Spiders with Loop Stitched Tinsel Leads
- Enhanced Voice Coil Cooling Systems
- Field Replaceable Cone, Voice Coil and Spider Assembly:
If you blow your sub, you can buy a replacement cone kit which allows you to easily swap out the blown/burned voice coil and surround with a new one;

The key technologies these sub woofers have are:

1) Cooling:
The HCCA motor assembly incorporates 4 methods of cooling to keep the massive 4" coil nice and cozy

* Heatsinks have been incorporated on top of the pole and on the back plate to pull heat away from the motor.
* The huge aluminum former has been cross-vented to allow cool air to flow through both sides of the voice coil.
* The cast aluminum basket has been thermally bonded to the top plate of the motor to provide the transfer of heat from the top plate into and thru the basket.
* Basket windows are machined into the areas surrounding the voice coil to allow for free air flow.

2) replaceable cone/voice-coil assembly unit:
All HCCA subs feature the replaceable cone/voice-coil assembly unit. With the custom beveled edge trim ring and the rugged spider ring, this assembly can be swapped out with only a few screw turns.

Subwoofer models that include these features: HCCA10.2, HCCA10.4, HCCA12.2, HCCA12.4, HCCA15.2, and HCCA15.4

Orion car audio company has made really powerful subs for an affordable price. The HCCA subs are considered to be one of the top subs in the market. I personally think that the Orion's are one of the best subs you can buy.

Remote Desktop Connection and RDP port forwarding

Remote Desktop Protocol: RDP is a protocol developed by Microsoft, to provide a user with a graphical interface to another computer. It is one type of application sharing protocol. In widows Xp and windows vista, RDP is pre-installed as Remote desktop connection.

Microsoft RDP includes the following features:

  • Encryption
  • Bandwidth reduction features
  • Roaming disconnect
  • Clipboard mapping
  • Print redirection
  • Virtual channels
  • Remote control
  • Network load balancing

The default port used for remote desktop protocol is port 3389. Now, if you are trying to use the Remote desktop feature of windows and are hosting your remote desktop pc from behind a router, you will require opening a port in your router for forwarding. Otherwise you can not remotely access your pc from another pc from the internet.

So what you can do is open the router configuration page. Specify another external port number and then point that port to the 3398(Default port for RDP) on the IP address of the computer that you wanted to access.

Another workaround is to change the listening port for remote desktop.

How to change the listening port for Remote Desktop

Following is the list of steps to follow to change (remote desktop protocol) RDP port:
This list includes steps that tell you to modify registry, but serious problem may occur if you do not modify registry correctly. For novice user it is better to take backup of the registry before applying following changes.

  • Start Registry Editor. ( Use windows Run : type command ‘regedit’)
  • Locate and then click the following registry subkey:

    HKEY_LOCAL_MACHINE\System\CurrentControlSet\Control\TerminalServer\WinStations\RDP-Tcp\PortNumber

  • From the edit menu, click on the modify link and then select decimal type for value.
  • You can enter here the new port number and then click OK.
  • Exit the Registry Editor.

Note: After going through the above list of steps, when you try to connect to this computer by using Remote Desktop Connection, you must enter the new port.

The main reason behind changing the RDP listening port is security. Since everyone knows that 3389 is default port for RDP. So anonymous user can check that port to find if you have Remote desktop enabled and can potentially attack on your network.


Thursday, September 17, 2009

GIANT STINGRAY PICTURE: Largest Freshwater Fish?


PICTURE: giant stingray


Fishers and scientists announced this week the catch, and release, of what is likely the world's largest known freshwater giant stingray

The giant stingray, weighing an estimated 550 to 990 pounds (250 to 450 kilograms) was reeled in on January 28, 2009, as part of a National Geographic expedition in Thailand.

The stingray's body measured 6.6 feet (2 meters) wide by 6.9 feet (2.1) meters long. The tail was missing. If it had been there, the ray's total length would have been between 14.8 and 16.4 feet (4.5 and 5 meters), estimated University of Nevada Biologist Zeb Hogan.

Hogan was in Thailand searching for giant fish as part of the Megafishes Project—an effort to document Earth's 20 or so freshwater giants.

The new find gives Hogan hope that the giant stingray, once overfished, may be more abundant than previously thought. And it may confirm the giant stingray as the heavyweight champ of the Megafishes Project.

"Honestly, we just don't know how much it weighed. But it's clear that the giant stingray has the potential to be the largest freshwater fish in the world," said Hogan, also a National Geographic Emerging Explorer. (National Geographic News is owned by the National Geographic Society.)

"The Thai populations were once considered critically endangered, although with the discovery of new populations the stingray's abundance appears higher than previously believed," added Hogan. The International Union for Conservation of Nature (IUCN) currently lists the freshwater giant stingray as vulnerable.

Last March Hogan found a 14-foot-long (4.3-meter-long) ray near the Thai city of Chachoengsao. (See previous giant stingray news and video.)

Freshwater giant stingrays are among the largest of the approximately 200 species of rays. They can be found in a handful of rivers in Southeast Asia and northern Australia.

Much is still unknown about the mammoth ray species, including whether or not it can swim out to and survive at sea. The species was first described scientifically only in 1989.

Hogan and his colleagues are still looking for new varieties and populations of the giant stingray.

Sunday, September 13, 2009

The Best Way To Market Your Blog Site And Increase Pageviews

Here are some ways you can promote your blog

1. Create great content – everything starts with great content. Think 'Linkbait" -- or writing about stuff that would be so great that people will want to link to you. It can be a news hook where you write about something that is contrary to what everyone else is saying; resource hook where you have the only information available or humor hook.

2. Update the content regularly – make your visitors come back again and again to your blog by providing daily updates (even multiple posts per day!)

3. Submit your blog to blog directories such as

BlogHop http://www.bloghop.com/account/index.htm
Blogarama http://www.blogarama.com/index.php?show=…
Contents Matter http://www.bloghq.com/create.php
PubSub http://www.pubsub.com/add_feed.php
BlogSearchEngine http://www.blogsearchengine.com/submit/
EatonWeb http://portal.eatonweb.com/add.php
RDFTicker http://www.anse.de/rdfticker/addchannel.…
Blogdigger http://www.blogdigger.com/add.jsp
Bloogz http://www.bloogz.com/man_en/add_your_ur…
BLOG’z http://www.sarthak.net/blogz/add.php
Columbia Newsblaster mailto: blaster@cs.columbia.edu
RocketInfo http://reader.rocketinfo.com/desktop/Add…
HeadlineSpot http://www.headlinespot.com/site/suggest…
KIOSKEN http://www.esperanto.se/kiosk/engindex.h…
CRAYON http://www.crayon.net/using/suggest.html
Kmax Bloglinks http://www.kmax.ws/featured.htm
BLOGCATALOG http://www.blogcatalog.com/blogs/submit_…
BalticBlogs http://directory.balticblog.com/addblog.…
Blogion http://blogion.com/?p=submit

4. Network with other bloggers – comment on their blogs, read and link to other blogs and request them to link back to you

5. Email other bloggers – pitch your post to other bloggers and hope that they will link or mention your blog

6. Use techniques to showcase your blog – examples include meme games such as the Daily Meme http://thedailymeme.com/ or carnivals http://blogcarnival.com/bc/

7. You can try pay per click programs such as Google Adwords http://www.google.com/adwords or Yahoo Search Marketing http://searchmarketing.yahoo.com... – though the key is to carefully track your ROI and which keywords actually perform well

8. Make sure your blog is indexable by the search engines - and make sure that your titles have great keywords that your target audience are most likely to use

9. Send out press releases. While outfits charge as much as $650 per release, there are free press release submission places on the Web. Press releases allow you to (a) attract media attention; (b) get more back links to your website without sending each website an email request; and (c) get more visibility especially if your press release gets in Google News or Yahoo News.

http://www.prleap.com/sign_up.html
http://i-newswire.com/
http://www.24-7pressrelease.com/ http://www.pressbox.co.uk/cgi-bin/links/
http://www.pr.com/press-releases
http://www.prfree.com/
http://www.clickpress.com/releases/index http://www.theopenpress.com/
http://www.przoom.com/
http://www.prweb.com
http://www.newswiretoday.com/
http://www.free-press-release.com/

10. Submit articles with your blog posts. Write articles and submit them to websites accepting author submissions. You get exposure for your business; establishes you as an authority in your field, and allows you to get backlinks for your website. If 50 websites publish your article and it contains a link back to your website, then you easily get 50 links from a single article. The more links you have, the greater your chances for increasing your search engine rankings.

5 Sex Secrets She Will Never Reveal To You

Women are mysterious creatures. While they're great at displaying emotions, often they'll hide their hidden desires. And this is especially true when it comes to what they like in the bedroom.

The truth is women have many secrets about what they like AND what they don't like from guys during sex. Probably right at this moment, your woman really wants you do things during sex which you not be aware of. If you can discover her hidden desires, then you'll rock her world.

To get an idea of what I'm talking about, here 5 of the most common sex secrets she probably will never reveal to you:

Secret #1- She doesn't want you to go for hours

Many guys think the key to pleasing a woman is to have the sexual stamina of a marathon runner and go for hours. The problem is women get tired (and sore) during a long sex session. Secretly your woman wants you know please her without subjecting her to a lengthy sex session. If you can please her in a half an hour, then she really won't care if you can go for hours.

Secret #2- She sometimes wants sex, not romance

While all women profess a love for romantic lovemaking filled with candles and soft music, sometimes they want sex to be a little dirty. Even though romance is an important part of the sexual experience, there are often moments when you can score some serious points simply by acting in a VERY non-romantic manner. For instance, she'll sometimes wants you to simply rip her clothes off and have a quickie.

Secret # - She wants YOU to be in control

It's a simple truth. Women want to be with men who act like MEN. This means you should never behave in a lower status man and act like you don't know what you're doing in the bedroom. Simply put, you have to act like a man when you're having sex.

Being a man is about knowing the specific things which pleases your woman and then DOING them. So when you're in the bedroom, don't act timid or shy. Instead give off the aura that you're completely confident during sex and you're in complete control of her pleasure.

Secret #4- She wants to try new things

There are a lot of different sexual experiences your woman secretly wants. Whether it's a bit of roleplaying, threesomes or even the "big A", she's probably privately fantasizing about stuff you can with her (or to her). The important thing to remember is everybody has fantasies. Your job is to coax them out of her and then work hard to fulfill them.

Secret #5- She wants it in the morning

Guys are known for the ability to be ready for sex in 3.5 seconds. Women on the other hand profess a desire for extensive foreplay. That's the reason why many guys think women don't want a "quickie" in the morning. However the truth is a lot of women secretly want a bit of sex in the morning before they start the day. Simply try to initiate things in the morning and you'll be surprised at her response

Women have lots of secrets they keep from men. But if you can reveal her secret desires in the bedroom then you'll quickly become her perfect lover.

So look for the warning signs of the 5 secrets I discussed in this article, and you'll be on your way towards sexually pleasing her.

Thursday, September 10, 2009

Cara-cara nak cover malu bila terjatuh


  1. Kalau tersepak batu
    Jangan terus bangun, sebaliknya anda baring dan terus berguling-guling hingga jauh dari perhatian ramai. Lepas tu baru bangun bila tiada orang nampak
  2. Kalau terjatuh daripada basikal
    Cepat-cepat naik semula basikal anda dan jatuhlah lagi sehingga berkali-kali supaya orang ingat anda sedang berlakon atau saja-saja buat lawak
  3. Kalau terjatuh tangga
    Terus bersilat seolah-olah anda sedang dirasuk atau sedang berlawan dengan makhluk halus..ala2 ahli silat gitewww..
  4. Kalau terjatuh dalam longkang
    Pungutlah sampah yang ada di dalam longkang tersebut sambil marah-marah dengan suara yang kuat, pasti orang menyangka anda seorang yang amat prihatin terhadap kebersihan. Hoh!
  5. Kalau jatuh ketika hendak menaiki bas
    Jeritlah sekuat hati, “Oi! Apa tolak-tolak ni?” walaupun tiada orang di belakang anda
  6. Kalau terjatuh di hadapan bus stop
    Terus buat-buat pengsan sehingga ada orang datang membantu anda. Sekiranya tiada, baring terus sampai malam dan jika tiada orang lagi di bus stop itu.. haa.. ni lah masa sesuai untuk bangun semula!
  7. Kalau jatuh tergelincir akibat lantai licin
    Tarik kawan(atau sesiapa yang ada bersebelahan anda) untuk jatuh bersama-sama supaya tidaklah anda sorang sahaja yang mendapat malu
Tips-tips ini hanyalah hiburan semata-mata..tiada kena mengena dengan sesiapa saja yang masih ada ataupun yg telah tiada..Hehehe

Wednesday, September 9, 2009

Tips for the Gentleman

If you're floundering in the bedroom and your girlfriend is moaning for all the wrong reasons, these tips will point you in the right direction.

Gentlemen! If you want to get your girl moaning for real instead of faking it, you're going to have to put a bit of work in. Firstly, a male can achieve orgasm within 2 - 3 minutes when stimulated by another partner. Where as a female can take up to 15 minutes to climax.

If you know for a fact that you can't keep going for that long by pure intercourse alone (and lets face it, if you're doing that, you're having sex, not making love) then you are going to have to stimulate her body with foreplay instead.

Now before you panic and freak out, all of this can be done with your tongue and hands. I guarantee you will become a better lover in the bedroom AND you really will give her orgasm after orgasm.

Here we go..

The neck

Apart from being sexy and attractive, the female neck is perhaps one of the most sensitive areas of her body. Softly kissing this area from her shoulder to below her ear (while at the same time massaging it with your tongue will send tingles and pulses up and down her spine. Keep at it and she will be breathing heavily in a very short period of time.

The ear lobes

Sucking ear lobes isn't for everyone. Some girls get the tickles when you do it but others simply adore it. While you're there you can whisper sweet nothings in her ear. Close facial contact is what she likes so this is a good way to do it if you're fed up with kissing on the lips. Also massaging her ear lobes with your fingers from time to time can be very soothing.

The nipples

On a par with the neck for sensitivity, the female nipples become hard and sit up right when stimulated with your tongue. Don't forget to give both breasts even attention and also kiss down in between her breasts as you work your way between both of them. If she hasn't grabbed your head by this stage and held it into her bosom, something's badly wrong.

The belly button

Working your way down her body, the belly button is another area you should stimulate before full intercourse. Kissing this area with your lips and tongue will cause vibrations that will vibrate through her reproductive area and begin to stimulate her G spot.

The G Spot

Ah the G spot. This holy grail legend of the female anatomy can be tricky to find. So if the chance arises, ask her if she has already found her G spot and let her point you in the right direction.

As a general guide, most female G spots can be found on the roof of the vagina (that's the side closest to her stomach.). It's about the size and shape of a 2 pence coin and can be found about 4 inches in.

Extreme caution should be taken when stimulating this area with your tongue or fingers as a female can quite literally lose control of her limbs. Don't be surprised if you get kneed in the face or get elbowed as she moans in ecstasy. It should also be noted that not all females have a G spot, so don't be alarmed if you both can't find it. As you have seen there are plenty of other areas of the female body that can be stimulated in the art of love making in order to help her climax.

Doing a combination of all these things will leave her begging for more and you will be a better lover for it. Experimentation is the key to find out what works and what doesn't as everyone is not the same.

As you can see, a true female orgasm involves the stimulation of her whole body and not just simple penetration. Taking the time to show care and attention to her needs will put you so far above any other lovers, she may have had that you may find it tricky escaping from the bed. I know I have ;-)

I hope this article helps your love life get back on track and that you become better and more confident at making love and not just having sex. Above all else, if you want to become a better lover, ask your partner what they like and what they want you to do to them. Not only will you help them get their rocks off quicker, you'll also show that you are thinking about their needs and they in turn will think about yours. This will create a much better experience than if both parties are concentrating on what each can get out of the experience in a very selfish way.

Tuesday, September 8, 2009

The Cigarette Name story

I am Peter Stuyvesant
I have two friends,
Benson and Hedges
I came from the city of
Marlboro,
In the
Salem high country
I Always carry a
Mild Seven
I rode on a
White Horse
Going to Kingsway in
Kent
It was
Lucky Strike I fell in love
With the daughter of
Master Duke
Her name Was
YSL
We got married by
Perillys , the priest
We checked in at the house of
Dunhill
And booked into room number
555
I laid her on the bed made of
Gold Leaf
I played with her two
Matterhorns
When I poked in my
Rothmans King Size
She cried in delight, "You are a
Rough Rider !!!"
You are riding like a mad
Camel
When I asked her if she is satisfied
She answered" I want
MORE! !!!"
Then suddenly she turned around and asked me if I want
to enter her
Gudang Garam.
She said... depan belakang puas, barulah
SAMPOERNA!!!

Monday, September 7, 2009

How To Promote Your Blog Using Facebook Pages

One of the more effective ways of promoting your blog is to use a site everyone either loves or hates – Facebook. The social networking site allows you to create a page to promote your blog or business – and it’s completely free. MakeUseOf has one and it’s doing very well.

By having a Facebook page for your blog, you can set up your RSS feed so your new posts appear on your fan page. Facebook members can then become a “fan” of your posts and comment on your posts inside Facebook.

In short, you can:

  • create a mini community of loyal blog readers inside Facebook.
  • encourage them to click through to your blog and sign up for the proper RSS feed.

So, are you interested in getting your page set up? If so, here’s how to get it set up quickly.

1. Sign up on Facebook

First you have to have a free Facebook account. If not then go here and set one up.

2. Click zee link

Then click on this link to get your fan page going. Here is the page that will then appear :

If you are creating a page for a blog / website, you will need to choose “Brand, Product or Organization”. Then from the drop-down list, select “website”.

Enter the name of your site (or whatever you want your page to be called) in “Name Of Other Business”, tick “I am authorized to create this page” (assuming of course you ARE authorized), enter your name under “Electronic Signature” and then click “Create Page”.

3. Customize Your Page

Your page will now be set up and you will be taken straight there.

Here are some of the things you can do to customize your page :

Customize your image :

The first thing your page obviously needs is an image. For blogs, the obvious image to first consider is your logo.

To upload an image, just point your mouse to the image area and a menu will pop up with various options.

You can either upload a photo, take a picture with your webcam or choose from a Facebook album.

Customize your site information :

In the “Info” tab, you can type detailed information about your site such as the URL, the “overview” (so this would be a good place to enter any tagline or motto that your site has. MakeUseOf’s is “Cool Websites, Software and Internet Tips”).

You can also enter information such as when you started the site and if you have any “products” you’d like to talk about.

In short, use this section to blab away about your site.

Set up your blog RSS feed to show your new posts in Facebook

This is, I think, one of the most important aspects of a blog fan page. If you are unable to show your new posts, how can you possibly persuade people to come to your site and sign up for the RSS feed?

  • First, click on the “notes” tab at the top of the page.
  • Select “Import A Blog” in the Notes Setting section. You can only import from 1 RSS feed at a time. Simply “Stop Importing” if you want to change the RSS feed.
  • Enter the RSS URL in the box provided. Check the box next to the statement that you actually own the content. You cannot import RSS feeds from websites that are not your own or that you do not have permission to reproduce.
  • Click the “Start Importing” button. Facebook will import the content of the RSS feed for you to preview. If everything looks OK, then go ahead and press the “Continue” button. Your RSS feed will now be automatically imported into your “Notes” section.
  • After that, everytime you publish a post on your blog, a summary of the post along with a link will appear on your Facebook page.

4. Publicise Your Page

Now that your Facebook page is all set up, all that remains to be done is to publicise it to your readers so they can “fan” you. Some methods to get the word out there include :

  • Writing a blog post about your new Facebook page (don’t forget to link to it).
  • Putting a prominent link at the top of your blog or in the sidebar. Just grab a Facebook logo from Google Images and then link it to your page.
  • Sending out an email to all your Facebook friends and telling them about your new fan page. If they were interested enough to become Facebook friends with you, I’m sure they will be interested in your blog too.

How To Configure Folder Redirection

Introduction

Folder redirection can limit the amount of data that is copied between the Roaming Profile Share and the Terminal Server at each logon and logoff. This is accomplished by redirecting folders like Desktop, My Documents, and Application Data to a Network Share outside of the Roaming Profile Share, so it is not copied at each logon and logoff.

Folder redirection can also provide locked down Desktop and Start Menu Folders by redirecting to Network Shares from which the end users can only read, or it can be set up so users' individual Start Menu and Desktop folders reside on a File Share instead of being copied back and forth with the rest of the roaming profile. This reduces the amount of data being transferred at each logon/logoff and provides a more stable environment for users that log on to multiple terminal server sessions at the same time. This is because there is no risk of data loss by one copy of the roaming profile’s Desktop Folder overwriting a previously saved copy, as they are always referring to the directory on the file share, not to a local profile folder.

Terminal Server Group Policy Best Practice

Before we dig into configuring Folder Redirection, let’s review how to configure Group Policies for use with Terminal Services. Best Practice for applying Settings to Users only when they log on to Terminal Servers would be to:

  1. Create an OU to contain a set of Terminal Servers
  2. Block Policy Inheritance on the OU (Properties -> Group Policy). This prevents settings from higher-up in AD from affecting your Terminal Servers.
  3. Move the Terminal Server Computer Objects into the OU. Do NOT place User Accounts in this OU.
  4. Create an Active Directory Security Group called “Terminal Servers” (or something similar that you’ll recognize) and add the Terminal Servers from this OU to this group.
  5. Create a GPO called “TS Machine Policy” linked to the OU
  6. Check “Disable User Configuration settings” on the GPO
  7. Enable Loopback Policy Processing in the GPO
  8. Edit the Security of the Policy so Apply Policy is set for “Authenticated Users” and the Security Group containing the Terminal Servers
  9. Create additional GPOs linked to this OU for each user population, i.e. “TS Users”, “TS Administrators”.
  10. Check “Disable Computer Configuration settings” on these GPO
  11. Edit the Security on these User Configuration GPOs so Apply Policy is enabled for the target user population, and Deny Apply Policy is enabled for user to which the policy should not apply.

With GPOs configured this way the Machine Policy applies to everyone that logs on to the Terminal Server (only the Computer Configuration Settings of the Machine Policy are processed) in addition to the appropriate User Configuration GPO (only the User Configuration portion of the GPO is processed) for the target user population.

Folder Redirection GPO Settings

Since Folder Redirection is in the User Configuration portion of a GPO, one can create multiple different policies and apply one to each distinct user population by filtering the security settings in the properties of the GPO. This allows administrators to redirect some users' folders to pre-configured directories, that the users do not have sufficient NTFS Permission to alter, and to redirect other users to folders that are self maintained.

Folder Redirection settings are located in User Configuration-> Windows Settings -> Folder Redirections. In that node one will find:

To configure an item, right-click and select “Properties”. This exposes the configuration UI for the specified folder. In a single GPO one can either configure the folder to redirect to a specified location for all users to which the GPO applies, or one can configure the folder to redirect to a specified location based upon group membership.

NTFS and Share Permissions

For folder redirection to work properly, the destination shared folder NTFS and Share Permissions must be properly configured. If redirecting a folder to a location that the end user should not change, i.e. the Start Menu or Locked Down Desktop the following permissions should be applied:

  • Share Permissions:
    • Everyone – Full Control
    • Administrators – Full Control
    • System – Full Control
  • NTFS Permissions:
    • Everyone – Read and Execute
    • Administrators – Full Control
    • System – Full Control

If Group Policy is configured to redirect to a location where the GPO will automatically create the destination folder, i.e. user’s individual Application Data, Desktop or My Documents folders the following permissions should be applied to the parent folder:

  • Share Permissions:
    • Everyone – Full Control
    • Administrators – Full Control
    • System – Full Control
  • NTFS Permissions:
    • Everyone - Create Folder/Append Data (This Folder Only)
    • Everyone - List Folder/Read Data (This Folder Only)
    • Everyone - Read Attributes (This Folder Only)
    • Everyone - Traverse Folder/Execute File (This Folder Only)
    • CREATOR OWNER - Full Control (Subfolders and Files Only)
    • System - Full Control (This Folder, Subfolders and Files)
    • Domain Admins - Full Control (This Folder, Subfolders and Files)

It’s important to note that when redirecting folders such as My Documents to a location that already exists, i.e. the User’s Home Folder there is another setting to consider, ownership. If the user is not the owner of the destination directory, folder redirection will fail with the default Folder Redirection settings. When this is the case, one must deselect “Grant the user exclusive rights to My Documents”

If this is not configured, folder redirection will fail and the following will be written to the Terminal Server’s Event Log:

Event ID: 101
User: username
Computer: computername
Description:
Failed to perform redirection of folder foldername. The new directories for the redirected folder could not be created. The folder is configured to be redirected to \\servername\sharename\%username%, the final expanded path was \\servername\sharename\username. The following error occurred:
Access is denied.

Notes:

  • User Configuration Settings in Group Policy take effect upon the first logon after the policy is saved and replicated to the user’s logon server.
  • Computer Configuration Settings in Group Policy take effect when the machine boots and logs on to Active Directory. With this in mind, one needs to reboot a terminal server before Computer Configuration setting changes will be applied.
  • Folder Redirection does not exist in Local Policy. If one wants to redirect folders without using Active Directory they should investigate redirecting folders by editing the registry at:
    [HKEY_CURRENT_USER\SOFTWARE\Microsoft\Windows\CurrentVersion\Explorer\Shell Folders]
  • If redirecting the Start Menu, one should be aware that “by default” users right clicking on Start Button to Explore will explore starting at the redirected folder’s network location, even if you have restricted access to My Network Places. To avoid this, one can edit the following registry entry:
    [HKEY_LOCAL_MACHINE\SOFTWARE\Classes\Folder\shell\explore\ddeexec]
    @="[ExploreFolder(\"DriveLetter:\\\", DriveLetter:\\, %S)]"

Summary

Folder Redirection is a powerful and fairly flexible set of configuration settings in group policy. As with anything in Group Policy, settings should be tested in a controlled environment, and piloted with a small set of users before deploying to a production environment.